DIY Wooden Ukulele Kit: Easy Build Instructions
DIY Wooden Ukulele Kit: Easy Build Instructions
Hey there, fellow music lovers! So you've decided to take the plunge and build your own ukulele? Awesome! Building a ukulele from a kit is a super rewarding experience, and it’s way easier than you might think. This guide will walk you through the process step-by-step, in a way that even a complete beginner can understand. Get ready to have some fun!

Getting Started: What You'll Need
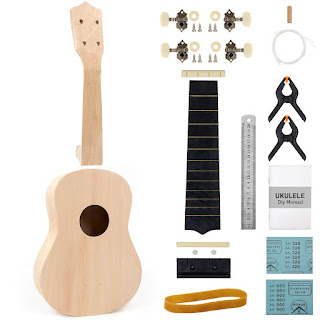
Before we dive into the construction, let's make sure you've got everything you need. Most ukulele kits come with pretty much everything, but it's always good to double-check. You'll typically find:
- Pre-cut pieces of wood: These are the body, neck, and headstock, usually already shaped and sanded to a significant degree.
- Fret wire: This will be used to mark the fret positions on the fretboard.
- Tuning pegs (machine heads): These allow you to tune your ukulele.
- Bridge: This sits on the body and holds the strings.
- Saddle: A small piece that sits on the bridge and affects intonation.
- Strings: Usually nylon strings are used for ukuleles.
- Fretting tools (if not pre-installed): A small hammer or mallet, and possibly a caulking tool or similar, might be needed to tap down the frets.
- Wood glue: A high-quality wood glue is essential.
- Sandpaper (various grits): You'll need sandpaper to smooth out any rough edges.
- Clamps: To hold the pieces together while the glue dries.
- A ruler or measuring tape: For accurate measurements.
- Pencil: For marking.
- Screwdriver (if needed): Some kits may require screws for the tuning pegs.
- Optional: Finishing materials (e.g., wood stain, varnish, polishing compound) to give your uke a nice look.
Important Note: Always refer to your specific kit's instructions. While these steps are general, some kits may have slight variations.
Preparing the Body and Neck
Attaching the Neck
This is usually the first major step. Carefully apply wood glue to the neck pocket on the body. Align the neck precisely with the body, ensuring it's straight and even. Clamp it firmly and allow it to dry completely according to the glue's instructions (usually at least a few hours, if not overnight).
Sanding and Smoothing
Once the glue is dry, carefully remove the clamps. Now it's time for sanding! Start with a coarser grit sandpaper (e.g., 80-120 grit) to remove any excess glue or rough spots, then gradually move to finer grits (e.g., 220-400 grit) for a smoother finish. Pay close attention to the areas where the neck and body meet for a seamless transition. This is crucial for a comfortable playing experience.
Installing the Fret Wire
This step requires some patience and precision. Most kits provide pre-marked fret positions, but carefully double-check the measurements. Use the mallet to gently tap the fret wire into the slots on the fretboard, ensuring it is seated securely but not forced. Once all the frets are in place, carefully file the ends of the frets flush with the fretboard. This is important to avoid snagging your fingers while playing. Carefully clean up any excess material with the sandpaper.
Attaching the Bridge and Tuning Pegs
The bridge is usually glued onto the body. Make sure it's positioned correctly, as this will influence the intonation of your ukulele. Apply glue and clamp firmly, making sure it's positioned straight and securely. Let it dry completely. Next, attach the tuning pegs (machine heads) to the headstock, following the kit's instructions. This step often involves screwing them in, but some kits use a different method.
Stringing Your Ukulele
This is the exciting part! Thread the strings through the holes in the bridge, then around the tuning pegs. Tune your ukulele using a tuner or a piano (if you're experienced enough). It will likely take several tries to get all the strings in tune, but be patient â€" you'll get the hang of it. Remember, your newly constructed ukulele will need some time to settle, and you might have to tune it frequently in the first few days or weeks.
Finishing Touches (Optional)
Once you're happy with the tuning and everything is secure, you can add a personal touch with finishing materials like wood stain or varnish. This protects your ukulele and enhances its appearance. Follow the instructions on your chosen finish for optimal results. Remember to let each coat dry completely before applying the next.
Playing Your Homemade Ukulele!
Congratulations! You've successfully built your own ukulele! Give it a good play, and enjoy the sound of your handcrafted instrument. Now you can customize your ukulele, and there are many possibilities here. Consider learning to play some basic chords. You can search YouTube for many video tutorials which will teach you how to play! Remember, the more you practice, the better you'll become!
Commonly Asked Questions
Q: What kind of wood glue should I use?
A: A high-quality wood glue specifically designed for musical instrument construction is recommended. Look for a glue that is strong, durable, and doesn't leave a noticeable residue after drying.
Q: What if my neck isn't perfectly straight?
A: A slightly uneven neck can sometimes be corrected with careful sanding and adjustments. However, if the neck is severely warped, it might be better to start over with a new kit. If your neck is slightly uneven, you can often use a clamping system and a small piece of wood with a bit of sandpaper to straighten it slowly.
Q: How long does it take to build a ukulele from a kit?
A: This depends on your experience level and how much time you have. A beginner might take a few days to a week, while someone more experienced could potentially finish it in a couple of hours.
Q: My ukulele is buzzing. What's wrong?
A: Buzzing is a common issue. It can be caused by several things, including high frets, loose frets, or problems with the bridge or tuning pegs. Carefully inspect each element to determine the cause and take necessary adjustments.
Q: Can I use different types of strings?
A: Yes, but using different types of strings might require adjusting the bridge height or saddle for proper intonation. Do some research before doing this.
Q: Where can I buy a ukulele kit?
A: You can find ukulele kits online through various retailers like Amazon, eBay, and specialized musical instrument stores. It is best to look for reputable sellers and make sure your ukulele kit comes from a trusted source.
I hope this guide helps you build your own amazing ukulele! Happy crafting!
Post a Comment for "DIY Wooden Ukulele Kit: Easy Build Instructions"