Creating a Wooden Ukulele Woodworking Project
Constructing a ukulele offers a rewarding woodworking experience, bridging the gap between crafting and musical creation. This detailed guide provides a comprehensive approach for beginners, emphasizing precision and safety throughout the process. While challenging, the project is achievable with careful planning and execution, resulting in a personalized instrument that embodies both craftsmanship and artistry.
I. Planning and Material Selection

A. Choosing Your Wood
The selection of wood significantly impacts the ukulele's tone and aesthetics. Mahogany is a popular choice due to its warm tone and relatively easy workability. Spruce, often used for the soundboard (top), provides a bright and resonant sound. Other options include koa (for a richer tone and distinctive Hawaiian aesthetic) and maple (for a brighter, crisper tone). Consider the desired tonal characteristics when making your selection. Ensure the wood is properly dried and free from significant knots or imperfections that could compromise structural integrity. For a first project, readily available and reasonably priced wood is recommended to minimize initial investment.
B. Gathering Tools and Materials
Creating a ukulele requires a variety of tools. Accurate measurements are paramount, necessitating the use of a reliable measuring tape, combination square, and calipers. Cutting and shaping the wood requires hand saws (both coping saw and tenon saw), chisels (various sizes), sandpaper (various grits), and a wood rasp. A planer, while not strictly necessary for a beginner, significantly simplifies the process of achieving flat surfaces. Gluing components requires wood glue and clamps (various sizes to accommodate different joinery). Finally, finishing the ukulele requires wood finishes (e.g., varnish, shellac, polyurethane), and brushes or rags for application. A complete list of materials with specific dimensions will be outlined in the subsequent sections.
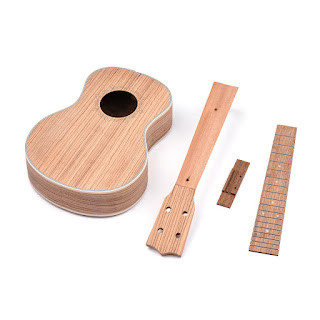
II. Construction: Body and Neck
A. Building the Ukulele Body
The body comprises the top, back, and sides. Accurate cutting and shaping are crucial. Templates, either purchased or created from accurate plans, are invaluable. These templates are used to trace the body shape onto the wood. Carefully cut along the marked lines using a coping saw, ensuring clean, smooth cuts. The sides require precise shaping to achieve the curved form of the ukulele body. A wood rasp and sandpaper are used to refine the shape and create a smooth, even surface. The top and back are planed to an appropriate thickness, ensuring consistent evenness. Joinery is essential; either using dovetail or mortise and tenon techniques (depending on complexity and skill level), ensuring a strong and secure connection of the body components. These joints require precise measuring and execution. Accurate glue application and clamping are vital for a robust and durable body. Finally, the soundhole needs to be precisely cut using a specialized drill bit or coping saw and subsequently smoothed to avoid sharp edges.
B. Crafting the Neck
The neck of the ukulele is crucial for playability. Begin by selecting a straight, appropriately sized piece of hardwood. The chosen wood should be strong and durable. Shaping the neck requires careful attention to detail. A rasp, chisels, and sandpaper are used to achieve the desired profile, ensuring smooth transitions and comfortable ergonomics. The nut slot, which holds the strings at the beginning of the neck, must be precisely carved. The headstock is then carefully shaped and the tuners are attached, ensuring they are firmly secured and aligned correctly. The neck is then accurately joined to the body using a secure joint (e.g., a mortise and tenon joint) and glued to ensure stability and prevent movement.
III. Fretting and Finishing
A. Installing the Frets
Precise fret placement is paramount for playability. Fret placement calculations require precise measurements based on ukulele scale length. Use a fretting jig to ensure accurate spacing. The frets (typically nickel silver) are carefully hammered into the pre-cut slots in the fretboard. Leveling and crowning the frets are crucial. A specialized fretting tool ensures a level and comfortable playing surface. Once the frets are properly seated, level, and crowned, the fret ends must be carefully filed and smoothed to avoid sharp edges and potential injury to the player.
B. Applying the Finish
The finish protects the ukulele and enhances its appearance. Multiple thin coats are preferred over fewer thick coats, minimizing the risk of runs and ensuring even coverage. Allow adequate drying time between coats. Sanding between coats removes imperfections and ensures a smooth finish. The chosen finish (e.g., varnish, shellac, or polyurethane) influences the final look and feel of the instrument. Each has its own characteristics in terms of durability, luster, and application. The final sanding is crucial for a flawless finish. A high-grit sandpaper (e.g., 320-grit or higher) and a final polishing with a suitable compound are employed to achieve a smooth and polished surface.
IV. Stringing and Setup
Once the finish has fully cured, the ukulele is ready for stringing. Use appropriate strings for the ukulele's size (soprano, concert, tenor). Proper string tension is crucial to ensure the ukulele's playability and to avoid damage to the instrument. After installing the strings, the ukulele requires a setup to adjust the intonation, action (string height), and neck relief. This may involve adjusting the bridge, truss rod (if present), and saddle height to achieve optimal playability. A qualified luthier or experienced ukulele player can assist with this process if needed. Finally, the ukulele should be tuned using a tuner to ensure all strings are properly pitched.
V. Safety Precautions
Safety should always be the paramount concern throughout this project. Always wear appropriate safety glasses to protect your eyes from flying wood chips and dust. Use sharp tools carefully and with caution. Keep fingers clear of blades during cutting operations. When working with glue, ensure adequate ventilation and follow the manufacturer's instructions carefully. Proper clamping techniques are essential to prevent injury during gluing operations. Always work in a well-lit and organized space to minimize the risk of accidents.
Creating a ukulele is a challenging but rewarding endeavor. With careful planning, meticulous execution, and a focus on safety, beginners can successfully construct their own instrument. This project encourages creativity, problem-solving, and the appreciation of handcrafted artistry.
Post a Comment for "Creating a Wooden Ukulele Woodworking Project"